Baby Steps into Open Source

As my baby steps into open source world, I have built a node web API that extracts phone numbers using an open source libphonenumber-js library as my OSD600 course requested.

Usages (file type support – txt, docx, pdf):

GET  /api/phonenumbers/parse/text/{...string...}

POST /api/phonenumbers/parse/file

Steps to create this API:

  1. pick a language and framework – Node, Express
  2. set up coding environment and dependencies – Node.js, npm, package.json
  3. create a basic web API structure and test it works
  4. understand the library and merge pieces into our use cases
  5. choose a testing framework and write test cases – mocha, chai
  6. test through HTTP clients – Postman


Why do I choose Node.js?

I know that Node.js has a good majority of communities and it provides the ability to write lightweight but high-performance backend server, so I thought it would be nice to get the hang of it before jump into the open source world.


Challenges?

The hardest part I found is actually finding a testing framework and writing the test cases. As I mention, Node.js has a majority of communities, and the communities provide feedbacks and supports for building a better Node.js. Therefore, there are so many testing frameworks out there, Jasmine, Jest, Mocha, AVA, Tape, you name it.

Well, which should I go for? To be honest, I believe the best way to figure this out is just randomly to pick one. For me, I end up choosing Mocha and Chai. The reason is very simple, because you are new, and you don’t have much enough knowledge to distinguish the pros and cons.


Being a maintainer or contributor?

Part B is to contribute to others’ API, focusing on bug fixes and feature requests.

Steps:

  1. follow README.md to set up the project
  2. go through steps to build, run, test
  3. reproduce error for bug fixes
    1. try to locate the issue
    2. debug
  4. locate related codes for feature requested
  5. write your codes and add the test case
  6. commit your changes to your remote branch
  7. create a pull request

Overall, the process of being a contributor is quite different than as a maintainer, and also more challenging. When you are solving other’s issue, it’s like you got thrown into nowhere, and you need to find your way out – understand other’s logic, sometimes even the whole picture. But the result is rewarding, you will learn not only the best practices but also the inefficient approaches which you can avoid in the future.


What I have learned:

There is so many good stuff I have experienced with for this project, Mocha, Chai, Multer, Heroku and some other open source libraries that support file parsing. I would also like to explore TravisCI later.

This’s just for fun, after you login into Heroku in the terminal, you can deploy your functioning node app directly from Github repo.

heroku login

./deploy.sh  git@github.com:josechoy/phonenumber-api.git  apponheroku


#!/bin/bash
# usage: ./deploy.sh <github_repo> <app_name>
# perform local testing
repo=$1
git clone $repo _repo
cd _repo
npm install
npm test
# start deploying
app=$2
heroku create $app;
git remote set-url heroku https://git.heroku.com/${app}.git
git push heroku master;
heroku ps:scale web=1;
heroku open;

view raw

deploy.sh

hosted with ❤ by GitHub

Get to Know VSCode as A Developer

I did use VSCode for a while a long time ago, simply as an editor to build ASP.NET with AngularJs project. Since I am using Mac at home, regardless of switching tools for different OS is very convenient. Back then, I have installed few extensions such as C#, TSLint mainly for the development environment.

But there are still so much to explore like I didn’t aware the live debugging feature before. And also, the main language of VSCode source code is TypeScript (91.5%, can’t believe I missed it 😵) and they use Electron to make it platform-independent as well.

Back to the topic, if we want to contribute to VSCode, there’re some prerequisites we need in order to build their source code. I have used Homebrew before, so the whole process of getting prerequisites went pretty smooth.

Build the source:

yarn run watch

Run development version of VSCode:

./scripts/code.sh

Now you can go hack Visual Studio Code!


Wait a minute before I end my blog.

Have you wondered why do you need all the prerequisites when you go through all steps and get them? And also why do they choose one over another?

I do. I don’t know what yarn is and I looked it up.

However, after reading yarn’s getting started page, I didn’t feel that impressed and a question popped up on my head – yarn does the exact same thing as npm, so why don’t Microsoft just use npm instead?

Then I found the official announcement of yarn from Facebook, so basically, they introduce issues that npm has raised, the attempts and the solution. It’s a pretty good article if you want to get a closer look at yarn.

So, what really turns me into yarn is the new process they built to fetch the packages. If you have been used npm for a while, you probably found the “works on my machine” bugs very frustrated. Especially, when you work with the release, it really takes up the time to figure out what the problem is. Although you can use npm ShrinkWrap as a workaround to lock down package version, it still requires extra efforts to consistently monitor and update.

Well, now with yarn, when you modify your package, it will automatically update the yarn.lock file, which ensures the exact same package being installed on different machines every time you run yarn. Hooray🙌🙌!

Using NPM ShrinkWrap to Lock Sub-dependency Versions

There may be times you want to restrict your package dependency versions for various reasons. NPM ShrinkWrap is used for this purpose, and it’s especially helpful when you need to control the versions of nested packages.

The usage is pretty straightforward. All you need is to create a npm-shrinkwrap.json and specify the versions inside. Then the second time you run npm install command, it will become replacement of your package-lock.json and get you the right package as you specified.

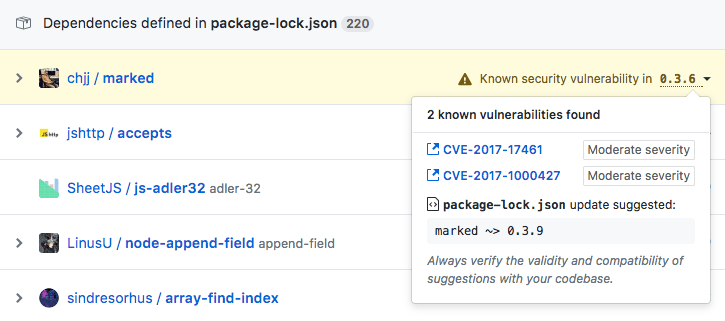
Let’s start with an example, I got this warning after merging a pull request for my current project from GitHub.

screen-shot-2018-02-14-at-5-52-33-pm-e1518660586168

It suggests to update one of my dependency or it might be vulnerable.

But I have no clue where this dependency is. Let’s try to locate the package by running npm list marked (notice you will need to run npm i first to get you node_modules):

Screen Shot 2018-02-14 at 8.07.07 PM

Great! Found it under textract – one of the dependencies in my package.json. 

Next is to have shrinkwrap downloaded.

npm install shrinkwrap --save

Now, create a npm-shrinkwrap.json and put the following:


{
"dependencies": {
"textract": {
"version": "2.2.0",
"dependencies": {
"marked": {
"version": "0.3.9"
}
}
}
}
}

Reinstall npm package and reissue npm list marked:

Screen Shot 2018-02-14 at 8.23.04 PM

Done! Successfully overwrite the version of textract sub-package.